There are probably as many painting techniques as there are painters.
Here, I'll go over in detail a painting technique I have evolved over many years of trial & error (mostly the latter!).
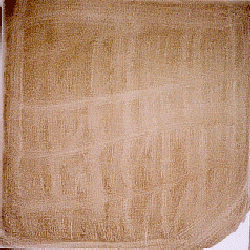
Beginning with a smooth canvas rubbed over with a little stain, made of black and raw sienna and linseed oil. Don't use raw or burnt umber, as you'll find it will dry much too quickly.
The corner as you see is left un-toned, as it is useful to have a reference point for white. This reminds you what 'white' actually looks like, and can stop the whole thing coming out tragically dark! It is surprising how one can end up thinking that the dirtiest grey is near white, if you have no explicit reference to correct you.
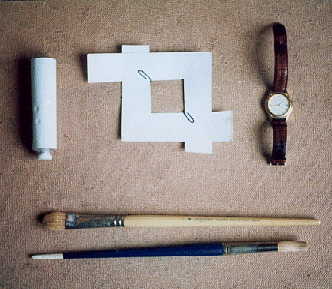
Below, you can see some of the tools of the trade. In particular, note the 'viewfinder', an essential part of this painting technique!.
This is very useful for composing the picture and defining exactly where the edges of your motif are going to fall. You can always paint on a canvas that is deliberately oversize, and then crop it when you're done, and that's fine if you're working on Masonite or cheap cotton. But you can waste a lot of money very quickly if you're chopping off and throwing away yards of linen canvas. It also forces you to get the composition of your painting as right as you can get it from the very beginning.
The watch in the picture is there to show scale. I don't usually do any actual painting with it!
The brushes shown are a reasonable size with which to begin a painting of this size, in this technique. (About 22" square.)
Below you can see the next stage in this painting technique. The grid lines are drawn in to help keep the picture in (large scale) proportion. Look through the viewfinder at your set up. Make estimates of the positions of the objects in question relative to the center line of the picture space, both horizontally & vertically.
Get the outlines of the subject proportioned on the canvas exactly as they appear in the viewfinder. (When I say 'exactly', take it with a slight grain of salt. Nothing I know of is ever 'exact'! But do the best you can.)
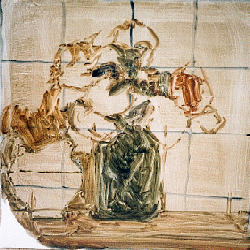
The outline of the subject is in, and although it may appear rough it is also pretty accurate. Note that I haven't outlined every single shape in the picture. What is important is the accurate arrangement of the large masses.
At this stage note too that all the paint used is thin. Thin paint can be modified easily. Thickly pasted paint cannot. As you get closer and closer to the final effect, you can feel freer and freer to indulge yourself with impasto. But get the fundamentals straight first.